How does the anti-snoring device work?

Many people and especially partners of many people are awfully annoyed with snoring. While sometimes you may yourself feel helpless, we are glad to let you know that you have nothing to worry about. With modern dental sciences, you can finally stop trying the old remedies that bore no significant results. With anti-snoring devices you can enjoy a normal peaceful sleep and so can your significant other who might be finding it hard to sleep with all that noise.
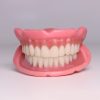
Before you explain to you the functionality of snoring devices let us understand how a snoring device actually works. Firstly, snoring is a phenomenon that occurs when during the course of normal sleep, the muscles which are mainly to control the tongue and soft palate hold and block the airway open. These muscles are supposed to relax during the time that you sleep. This is when the blockage of the air creates a problem as the tissues of the upper airway vibrate as air passes over them, creating a snoring noise. This may be a cause of immense discomfort to many and while you may not realize it snoring is not the best thing for you. It is not only is loud and unpleasant, especially to the person sharing a bed with you, but it can often also lead to interrupted sleep, headaches, a sore throat, day time sleepiness, and mental impairment. This is why a good night’s sleep is always important so that you can have a pleasant and wholesome day. A proper sleep pattern is also the key to boosting your quality of life and thus if you are a snorer make sure you invest in an anti-snoring device to make sure you sleep at ease.
The science behind
For someone who doesn’t snore the flow is in an orderly manner, without any obstruction, through both the nose and mouth. It is often due to the vibration of the tissues of the upper airway as you breathe in and out. It’s this vibration that eventually leads to the popular snoring sound we know about and despise. Once an anti-snoring device fitted, the lower dental splint of the device advances the jaw slightly keeping the airways open. This, in turn, proves in improving the flow of air and significantly reducing down on the vibration of tissues that cause the detestable snoring. The degree of advancement required with the device may vary from person to person so you must consult a doctor before purchasing an anti-snoring device.
How does it work?
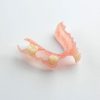
Your oral appliance, the anti-snoring device will treat snoring by advancing the lower jaw. This, in turn, will keep the airways open. With the airways open the air will now flow more comfortably and without any roadblocks. Further, the appliance can be custom made to your preferences i.e. by measure, for you. As to how it looks and appears, we would inform you that the device consists of an upper blue and a lower green splint that will enable the smooth flow of air leading to a peaceful goodnight sleep.
Instructions to use an Anti-Snoring device
The following is a roadmap for you after you consult the doctor and determine if an anti-snoring device is an answer for you. Just follow the simple steps below and you will be all set to a life with comfortable sleep:
- Insert the Appliance
First comes the step of inserting the anti-snoring device. For this, you will have to run the appliance under warm running water before you try to insert it. After which you must place the appliance in the mouth. Make sure that the blue upper splint is onto your upper teeth. The next step is to make sure you properly press upwards on the splint with both thumbs. This is to make sure that the device fits securely and comfortably into your mouth cavity without causing any discomfort. Repeat the step for one if you can’t adjust it in the first go as well as you would desire.
- Seating the lower splint
After you have adjusted and inserted the upper splint make sure you now focus on seating the lower splint. Here you should slide your lower jaw forward until it locates into the green lower splint. Once it does now you have to press down on both sides of the splint using your index fingers to ensure that it fits securely. Like it was advised before if it feels uncomfortable to make sure you take the device out and redo the steps again. These devices are built it adjusts to the shape and alignment of your mouth.
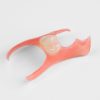
- Removal of the device
This is the step is awfully important and you must remove the splints carefully lest damaging them. Firstly, make sure you always remove the lower green splint first. You must do this with your thumbs pressing both sides under the edge of the splint. Then you must gently push the lower splint up and remove it.
Next is to remove the upper Blue upper splint. For this, you have to gently pull down with both your index fingers and thumbs and remove it. After you remove the splint in the morning, it may feel different to bite. But rest assured this is only temporary.
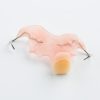
This is where a bite tab will help you. It will relax your muscles and you will feel normal again. Next, you have to place it between your upper and lower front teeth. After which you must move your lower jaw back until the feeling of tension goes away. The bite tab must be used for at least 10 minutes every morning.
We at Dental Lab Direct understand the needs of our clients. With customer satisfaction as one of our major goals, we will make sure that you get what is best for you!
Contact us now with your queries. With a team of trained professionals, we can assure you that we will find the best solution for you.